Flashing a lean-to on a metal building is an essential process that ensures longevity and prevents water damage, and this article will guide you through each necessary step.
Flashing a lean-to on a metal building is an essential task to ensure the structure’s longevity by preventing water leaks. This process involves several steps, including the installation of J-trim, the application of butyl tape, and the correct placement of the flashing itself.
Understanding these steps and their correct order is crucial for a successful installation. As you delve into this article, you will find a detailed, step-by-step guide that covers every aspect of this process. From selecting the right materials to the actual installation, this guide has got you covered.
So if you’re looking for a comprehensive tutorial on how to flash a lean-to on a metal building, you’ve landed on the right page. Let’s get started.
Key takeaways:
- Use durable flashing material (aluminum, vinyl) for effective weatherproofing.
- Understand different styles of lean-to structures (single slope, mono-pitched, salt-box).
- Follow detailed steps for proper flashing installation.
- Carefully choose the joining point and determine the peak of the metal building.
- Properly cut lumber, drill holes, and choose the best type of flashing.
Understanding What a Lean-to Building Is

A lean-to is essentially a simple structure, often with only three walls and a single-pitched roof. This design allows the structure to sit adjacent to another building, using it as support. One end of the lean-to is typically taller than the other, allowing rain and snow to slide off the roof away from the main building, a feature that underscores its practicality.
While commonly associated with sheds and farm buildings, the lean-to is also practical for metal buildings. It provides additional storage space or working area while saving on construction materials. A lean-to can be added to an existing metal structure with minimal adjustments, making it a popular choice for extensions.
Proper installation of a lean-to comes with a set of nuances and one of those nuances is flashing. Its slanted structure can make the process of installing flashing a little more complex, but it’s a critical step in ensuring that the addition becomes a true asset to the existing metal building.
Remember that without sufficient flashing, water can seep into the structure, prompting rust, mold, and other issues. So, it’s necessary to understand what a lean-to structure is before learning how to flash it. Also, be aware that the construction and flashing techniques might differ slightly depending on the size and design of the lean-to and the main metal building.
Different Styles of Lean-To Structures

Primarily, there are three main styles of lean-to structures, which are differentiated by the positioning of the roof.
1. Single Slope Lean-to: This model has one side higher than the other, creating a significant slope. It’s a common choice for compact spaces or alongside an existing structure, and water runoff is efficiently managed due to the steep angle.
2. Mono-pitched Lean-to: Here, the roof has just one single flat surface. The lean-to is higher at the edge attached to the main building and slopes downwards away from it. Excellent for conservatories or home extensions.
3. Salt-box Lean-to: This style is characterized by a long, pitched roof that slopes down to the back. Offering more headroom, it is typically used for larger spaces.
Among these styles, your choice would be dictated by factors like intended use of the lean-to, space availability, weather conditions, and aesthetic compatibility with the main structure.
Detailed Steps to Flash a Lean-to On a Metal Building

To achieve a successful flashing of a lean-to on a metal building, effective steps need to be taken. Firstly, locate the joining point of the lean-to and mark it out. This is where the main metal structure and lean-to will unite.
Prepare for the task with the necessary tools: a circular saw for cutting timber, a drill for making holes in the metal, and a silicone sealant for making the joined sections watertight.
Cut the lumber needed for the lean-to, ensuring you’ve measured correctly. The fit should be precise for a secure attachment to the main building. This is a critical step because incorrect cutting can have detrimental effects on the stability of the addition.
Drill holes into the metal part of the building to accommodate your lean-to addition. The holes must align with the lean-to’s rafter locations to ensure proper attachment.
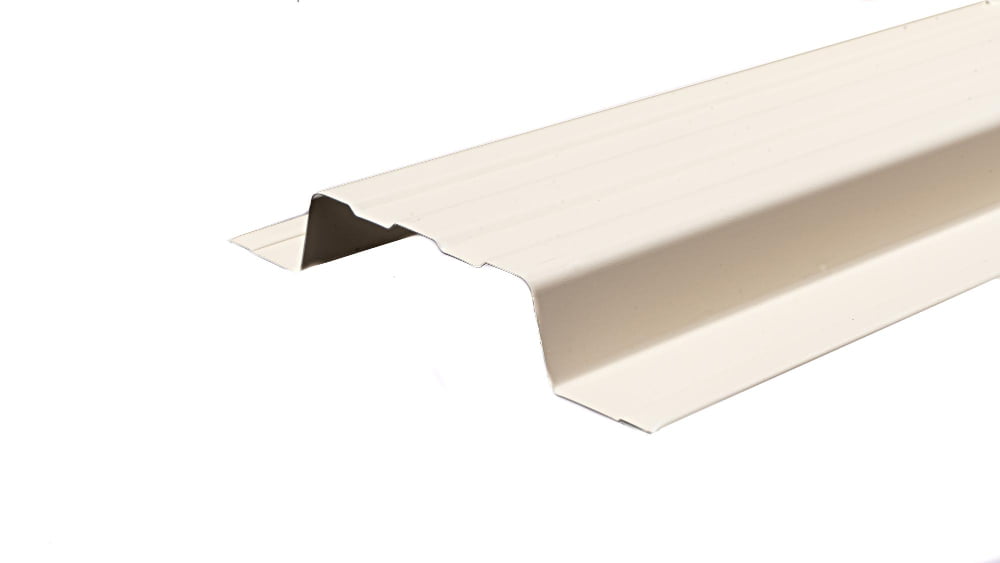
Now comes the actual flashing. Choose a durable and suitable flashing material, such as aluminum or vinyl. This material will serve as the protective barrier between your lean-to and the metal building.
Lastly, properly attach the cut boards on the metal building into the drilled holes. Ensure that they align correctly with the lean-to rafters for a sturdy structure.
Remember, the rafter spacing should neither be too close that it weakens the overall structure nor too wide that it compromises the lean-to’s stability.
In a nutshell, follow these steps to ensure the lean-to is flashed onto the metal building effectively.
Choosing the Joining Point for Lean-to

Where you decide to position your lean-to is driven substantially by purpose and functionality. Although it can be attached to any side of the metal building, careful thought should be employed. For instance, if you plan to use your lean-to for vehicle storage, placing it on the most accessible side of the building would be beneficial.
Keep in mind the building’s existing design and the integration of the lean-to that you’re adding. Also, consider factors such as wind direction and sunlight exposure. A southern exposure, for example, might be ideal for a greenhouse lean-to. Finally, be certain that the land’s slope supports proper water runoff and will not lead to water pooling under your lean-to structure.
Every structure is unique, and so must be your choice of the joining point for your lean-to. A well-thought-out decision can ensure convenience, longevity and effectiveness. Remember, the right placement can significantly enhance the value and function of your lean-to.
Determining the Peak of the Metal Building

To effectively set up a lean-to, identifying the peak or the highest point of the metal building is critical. This point determines how your lean-to shed will align with the main structure. The peak is typically located at the centermost part of the roof.
Step 1: Start by measuring the height of your metal building at its centermost part. You can utilize a simple tape measure for this.
Step 2: Match this measurement with the highest point of your lean-to’s roof. It’s essential to ensure that the slope of the lean-to roof matches that of the metal building.
Step 3: Verify the accuracy of your measurements. Misalignments could lead to issues during the flashing process, including water leakage and poor aesthetic appeal.
Remember, your lean-to needs to complement your metal building and function effectively, as well. As such, accuracy in these initial steps is paramount.
Properly Cutting the Lumber for Lean-to

Before cutting, always measure twice to reduce errors. The length of the lumber will primarily depend on the height of your existing metal building and the desired slope of the lean-to. Use a circular saw for easier and cleaner cuts.
For the lean-to’s base, cut two pieces of lumber to the length that matches the width of your metal building. Now, bear in mind the intended slope when cutting the rafters. A common lean-to slope is about 30 to 40 degrees. By marking the angle on one end of your rafters, you will ensure proper drainage when the structure is complete.
Remember, safety should never be compromised. Always wear eye and hand protection when cutting lumber. Additionally, make sure your work area is clean and free of impediments. Lastly, dispose of your offcuts in a designated area to prevent accidents.
Drilling Holes for Joining Sections

To effectively drill holes for joining sections, adhere to the following pointers:
1. Use a marker to indicate where you will drill. Markings should align with the joining sections to ensure a perfect fit.
2. Choose the right size of the drill bit – it should correspond to the size of the bolts that will be used in the joint. The hole must allow the bolt to pass through without obstruction, yet not be too large to compromise the structural integrity.
3. Safely operate the drill. Always wear safety equipment, such as protective eyewear, to keep away from possible debris. Hold the drill firmly, maintaining a perpendicular position to the metal surface for a straight hole.
4. Test-fit the joining sections once holes have been drilled. This brief check helps ensure a snug fit, and can identify any miscalculations before completing the assembly with bolts.
Choosing the Best Type of Flashing for a Lean-to

There are varying options in the market when it comes to choosing flashing for a lean-to. Here is where knowledge of material blend could affect durability and overall construction quality.
Aluminum flashing is a popular choice, noted for its lightweight nature, longevity, and corrosion-resistant properties. It’s also easy to shape, making it ideal for tricky corners. However, it isn’t a good match for concrete or brickwork due to potential reactions between the materials.
Galvanized steel flashing, an equally great choice, offers a combination of cost-effectiveness and robustness. It presents a sturdier option, resilient in various weather conditions. Beware of possible rust risks over time, though, which could necessitate more frequent replacements.
Copper flashing, although slightly expensive, offers one of the best lifespans in the industry. It’s commonly used for its aesthetic appeal, adding elegance to the overall structure, but also features excellent durability. Its advantage spike given its natural resistance to algae and fungi.
While choosing, consider balancing between quality, price, and the specific needs of your lean-to structure. Being clear on these factors helps in making an informed decision that enhances the overall integrity of the building.
Understanding Where to Place the Drip Edge During Flashing
Placement of the drip edge is a critical step in the flashing process. It is strategically placed to guide water away from the building’s structure, essentially protecting it from water damage.
Here are a few key points:
- The drip edge should be placed directly below the roofing felt. This ensures that any water flowing down is effectively led away.
- The edge of the drip should slightly overhang the gutter. This alignment allows water to go directly into the gutter, avoiding wet walls and potential damage.
- Be sure to securely fasten the drip edge. This precision helps it remain in place even during extreme weather conditions.
- Use a string line to ensure the drip edge stays straight end-to-end. Uneven placements can lead to improper water flow, defeating its primary purpose.
While simple, these precise placements are essential in an effective drip edge installation and ensure the longevity of your lean-to building.
Knowing How Far Apart the Rafters Should Be On a Lean-to

When setting up the rafter spacing, consistency is key. Ordinarily, every 16 to 24 inches is a standard measure. However, in the case of a lean-to structure, adjusting for the slope and load requires consideration. The steeper your roof incline, often the closer the rafters need to be.
Rafter spacing adjustment can affect the material costs. Greater spacing means less lumber manufacturing and often cheaper expenses. But, there’s a limit, as excessively spaced rafters can cause poor structural integrity.
Each lean-to project presents unique circumstances. Hence, consider factors such as local weather conditions and the potential snow load. Always consult the local building codes and check with the local zoning authority to ensure the procedures are in line with regulations.
Carefully marked rafter placements can eliminate confusion during the installation process and promote even distribution of weight across the lean-to roof. Through meticulous planning and measuring, you can achieve precise rafter spacing for a structurally sound lean-to.
Proper Attaching of the Lean-to On the Metal Building

Once the appropriate location for your lean-to is identified, the next steps involve securing it to the main metal building.
1. Start with the foundation, either concrete or another suitable base, ensuring it’s level for the structure’s stability.
2. Erect the posts for the lean-to. These will be attached to the metal building using sturdy brackets. Confirm they are “plumb,” or perfectly vertical – use a level to check accuracy.
3. Install the support beams connecting all posts along the top, adding integral strength to the lean-to.
4. Position the rafters from your main building to the outer post, then add horizontal purlins along these for added support.
5. Secure each element by using high quality, rust-proof screws or bolts. Remember, these attachments will face weather extremes, including wind and rain.
6. Always double-check all joints, ensuring each attachment is firm and secure.
Remember, a solidly attached lean-to provides not only useful extra space but can improve overall building stability. Its attachment must be thorough, carefully executed, and regularly maintained.
Why Lean-to Additions Are Beneficial to Buildings

With a lean-to addition, you can maximize your available space. A common observation among metal building owners is the expansion of storage capability without having to construct a whole new building. Plus, it provides a unified appearance as it appears as an integral part of the original structure.
Secondly, lean-to additions provide weather protection. When located on the sides of your building, a lean-to serves as a shield against wind, rain, or sun, ensuring longevity for your structure.
Finally, having a lean-to is cost-effective. The amount of materials, construction time, and labor costs are noticeably reduced compared to constructing a standalone structure. This makes it an ideal solution for those needing extra space on a tight budget.
FAQ
Can I add a lean-to on my metal building?
Yes, you can add a lean-to on your metal building to increase the usable area.
What is the spacing for lean-to post?
The standard spacing for lean-to posts is typically every 12 feet, but 10 foot and 14 foot spacings are also commonly utilized.
Can you add onto a metal building?
Yes, adding onto a metal building is possible and it offers an affordable, reliable, and low-maintenance solution for expanding your existing structure.
What materials are necessary for flashing a lean-to on a metal building?
For flashing a lean-to on a metal building, necessary materials include metal flashings, sealant, a weather barrier, fasteners, a measuring tape, a metal cutting shear or saw, and safety equipment.
How does the slope of a lean-to affect its construction process?
The slope of a lean-to impacts its construction process by determining the materials and reinforcements needed, specific weather considerations, and drainage angles, ultimately affecting its overall durability and function.
What are the necessary steps to ensure proper sealing and waterproofing of a lean-to on a metal building?
To ensure proper sealing and waterproofing of a lean-to on a metal building, one must inspect the structure, apply an appropriate sealant to gaps, install flashing where necessary, and conduct regular maintenance checks.
Related Reading:
- How to Fasten Ledger Board to Metal Building: Step-by-Step Guide
- How to Install a Door in an Existing Metal Building: Your Comprehensive Guide
- How to Install Base Trim on Metal Building: Guide and Tips
- R Panel Transition Flashing: Step-by-Step Installation Guide
- How to Flash a Window in a Metal Building: Comprehensive Guide on Window Flashing Techniques